

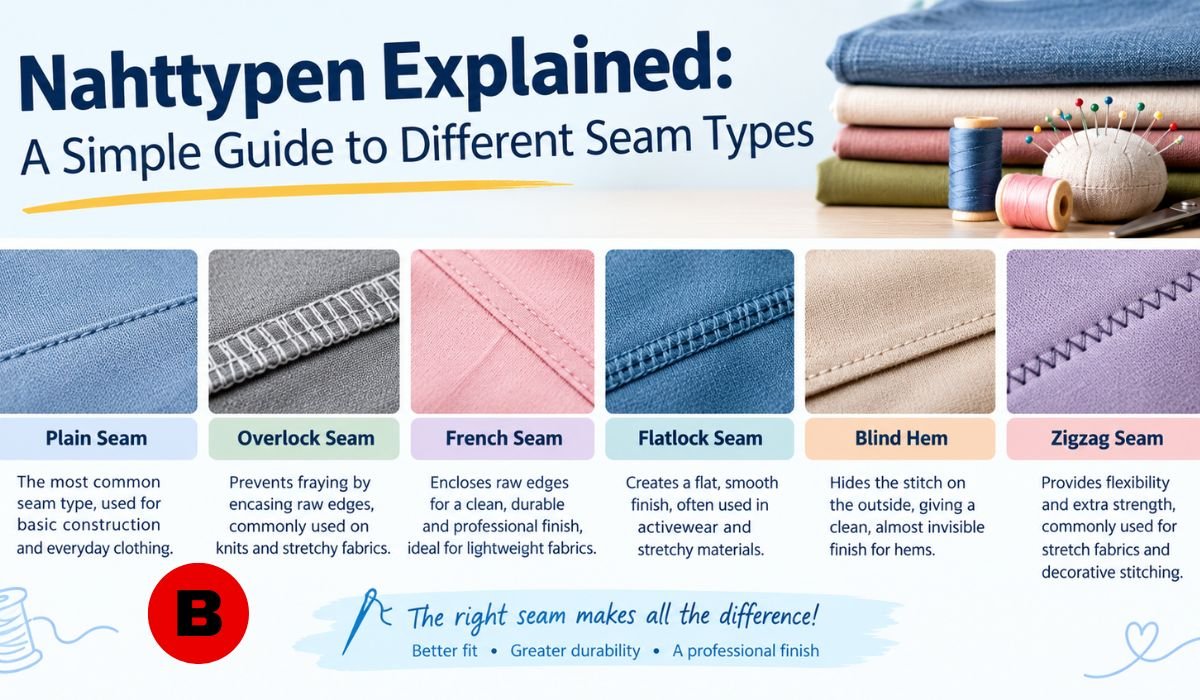
Introduction: Why Seam Types Matter In Sewing
Sewing can look deceptively simple. Two pieces of fabric are placed together, a line of stitches joins them, and a garment or project begins to take shape. Yet that seemingly simple connection can have a major effect on the finished result. The way fabric is joined can influence its strength, comfort, appearance, durability, and even how polished the inside of a garment looks.
That’s where Nahttypen, the German term for Seam Types, comes into the picture. Different seams are designed to solve different sewing problems. A Plain Seam may be perfectly suitable for a basic woven project, while a French Seam can provide a clean enclosed finish on lightweight fabric. A Flat-Felled Seam, meanwhile, is commonly used where durability is especially important, such as in jeans and other hard-wearing garments.
Learning about Nahttypen doesn’t mean you have to memorize every sewing technique available. The real goal is to understand what each seam is designed to do and how the choice should change according to the fabric and project. Once that connection becomes clear, choosing a seam feels far less complicated.
You can start by asking a few simple questions. Does the fabric fray easily? Does it stretch? Will the seam be under considerable stress? Should the raw edges remain visible or be completely enclosed? Does the inside of the garment need a particularly neat finish? The answers can guide you toward the most suitable construction.
Quick Bio Information: Nahttypen At A Glance
Nahttypen: The German term for different Seam Types.
Naht: The German word for a seam or sewn connection.
Plain Seam: A versatile construction used across many sewing projects, particularly with woven fabrics.
French Seam: A self-enclosed seam that hides raw fabric edges within the finished construction.
Flat-Felled Seam: A durable seam that encloses the raw edges and secures the allowance flat.
Lapped Seam: A construction in which one fabric edge overlaps another.
Bound Seam: A seam allowance finished by covering its raw edge with binding.
Hong Kong Finish: A polished seam finish that uses lightweight bias-cut fabric or bias binding.
Overlocked Seam: A seam or edge treatment produced with an overlocker or serger.
Seam Allowance: The area between the stitching line and the fabric’s cut edge.
Raw Edge: The cut, unfinished edge of fabric.
Seam Finish: A method used to control, protect, or decorate a raw seam edge.
Pressing: The controlled use of heat and pressure to shape and settle sewing work.
Walking Foot: A presser-foot attachment that helps feed multiple fabric layers more evenly.
Puckering: An unwanted gathered or wrinkled appearance along a seam.
Seam Line: The line along which fabric pieces are joined.
Fabric Weight: The relative heaviness or thickness of fabric, which can influence seam choice and bulk.
Test Sample: A small piece of the actual fabric used to check machine settings and seam construction before starting the final project.
What Does Nahttypen Mean?
Nahttypen is the German term for Seam Types. In sewing, it describes the different ways pieces of fabric can be joined and constructed.
A Seam is the stitched connection between pieces of fabric. A Seam Allowance is the section between the stitching line and the fabric’s cut edge. A Seam Finish is different again. It refers to a technique used to control, protect, or improve the appearance of a raw seam edge.
These terms are closely related, but they aren’t interchangeable. A Plain Seam, for example, joins two pieces of fabric but may leave raw edges inside the garment. Those edges can then be finished separately. A French Seam takes a different approach by enclosing the raw edges within the seam itself.
Sewing terminology can also vary between countries, pattern companies, textbooks, and professional sewing traditions. For that reason, understanding how a technique is constructed is often more useful than relying on its name alone.
For beginners, this distinction can make sewing instructions much easier to understand. Once you know whether you’re joining fabric, finishing an edge, or doing both at once, unfamiliar terminology becomes much less intimidating.
Why Choosing The Right Seam Is Important
The right Seam Type isn’t simply the one that holds two pieces of fabric together. It also needs to suit the demands placed on that particular part of the project.
Think about the difference between a loose blouse and a pair of work trousers. The blouse may need a neat interior and a lightweight construction, while the trousers could require seams capable of handling repeated movement, friction, washing, and pulling. Both are garments, but their seams have very different jobs.
Fabric characteristics matter just as much. Lightweight fabric can become unnecessarily bulky when several layers are folded together. Loosely woven material may need additional protection because its edges can fray. Stretch fabric needs a construction that can move with the material rather than restricting it.
Appearance is another consideration. A seam can be almost invisible, deliberately decorative, or designed to create a particularly clean interior. On an unlined garment, that interior finish becomes especially important because the seam allowances are visible when the garment is opened.
So, choosing among different Nahttypen is really a practical design decision. Fabric weight, stretch, fraying, durability, comfort, appearance, and intended use all play a role.
The Main Types Of Seams Every Beginner Should Know
There isn’t one universal seam that works perfectly for every sewing project. The Plain Seam is one of the most versatile and widely used options, particularly for woven fabrics. Other seam constructions are designed to address more specific needs.
A French Seam encloses raw edges inside the finished seam, making it especially useful for lightweight or sheer fabrics. A Flat-Felled Seam encloses the seam allowances and secures them flat, creating a durable construction often seen in jeans, shirts, and other garments designed for regular wear.
There are also Lapped Seams, Bound Seams, Hong Kong Finishes, and Overlocked or Serged Seams. Each has its own purpose, and some are better understood as seam finishes rather than completely separate ways of joining fabric.
That distinction is worth remembering. Sewing references don’t always categorize every technique in exactly the same way. What matters most is understanding what the construction accomplishes and why you might choose it.
Plain Seam: The Everyday Sewing Essential
The Plain Seam is one of the fundamental building blocks of sewing. In a typical construction, two fabric pieces are placed with their right sides together, aligned along the seam, and stitched at the specified Seam Allowance. Once the stitching is complete, the seam can be pressed open or toward one side, depending on the pattern and project.
Its greatest strength is versatility. Plain Seams are used in clothing, bags, cushions, home décor, quilting, and countless other projects. Because the construction is straightforward, it’s also an excellent place for beginners to develop accuracy and machine control.
A Plain Seam shouldn’t be dismissed as a basic or inferior technique. When it’s accurately sewn, properly pressed, and finished appropriately for the fabric, it can produce a clean and durable result.
The raw edges can be finished in several ways. Depending on the material and project, a sewist might use an Overlocker, Zigzag Stitch, Pinking, Overcasting, Binding, or another suitable method. The important thing is to choose a finish that matches the fabric rather than assuming every seam needs the same treatment.
French Seam: A Neat Finish For Lightweight Fabrics
The French Seam is a self-enclosed construction that hides the raw fabric edges inside the finished seam. That makes it particularly useful when you’re working with lightweight or sheer woven fabrics and want the inside of the garment to look as neat as the outside.
The construction takes place in two stages. The first seam is sewn with the fabric positioned so the raw edges can later be enclosed. After the excess allowance is trimmed as needed, the fabric is turned and a second line of stitching traps those raw edges inside.
The finished seam is narrow, tidy, and free from an exposed raw edge. That makes French Seams a popular choice for delicate blouses, sheer garments, lingerie, and other lightweight projects.
There are limitations, though. Because the seam encloses additional fabric, it can create unnecessary bulk in heavier materials. It also becomes more difficult to construct neatly around sharply curved seams. Straight or gently curved areas are generally better suited to this technique.
Knowing when not to use a technique is just as valuable as knowing when to use it.
Flat-Felled Seam: Strength And Durability Combined
The Flat-Felled Seam is a durable construction in which the seam allowances are enclosed and secured flat. It is commonly associated with woven garments that need a strong, neat finish, including jeans, shirts, sportswear, and other hard-wearing clothing.
The construction generally involves making one seam allowance narrower than the other. The wider allowance is then folded around the narrower one and secured with stitching, leaving the raw edges enclosed.
This construction has both practical and visual benefits. The enclosed edges are protected, while the finished seam can provide a distinctive appearance. On garments such as jeans, the visible rows of stitching can become part of the design rather than merely serving a structural purpose.
Flat-Felled Seams do have a downside: several layers can meet in the finished construction. With heavy denim or canvas, that extra thickness can become challenging for both the sewist and the machine. Around curves, the technique can also be more difficult to execute neatly.
For that reason, durability shouldn’t be considered in isolation. Fabric thickness, seam location, machine capability, and the desired appearance all need to be taken into account.
Other Useful Nahttypen And Seam Finishes
Once you’ve become comfortable with the basic seams, several additional techniques are worth exploring.
A Lapped Seam joins fabric by overlapping one edge over another. Depending on the design, this can provide a visible decorative effect or solve a construction problem where a conventional seam isn’t appropriate.
A Bound Seam covers the raw seam allowance with a strip of fabric or binding. Besides controlling fraying, it can create an attractive and deliberate finish inside an unlined garment.
The Hong Kong Finish takes this idea further by using lightweight bias-cut fabric or bias binding to cover seam allowances. It’s particularly suited to polished interiors on unlined garments, including tailored jackets and vests.
An Overlocked or Serged Seam uses a specialized machine to trim and wrap the raw edge with thread. This makes overlocking particularly useful when efficient edge finishing is needed, and it can be especially practical for many knit garments.
These methods don’t all serve precisely the same function. Some primarily join fabric, while others are focused on finishing exposed edges. Understanding that difference makes sewing instructions much easier to follow.
How To Choose The Right Seam For Your Fabric
When choosing Nahttypen, start with the fabric rather than the name of the seam.
Lightweight woven materials often work well with French Seams when the goal is a clean, enclosed interior. Sheer and delicate fabrics may benefit from the same approach, although they also require careful needle selection, gentle handling, and appropriate pressing.
Linen deserves particular attention because many linen fabrics can fray. Depending on its weight and construction, the seam allowance may be overlocked, zigzagged, bound, enclosed, or finished using another suitable method.
Denim, canvas, and other sturdy woven materials can handle more substantial constructions. A Flat-Felled Seam may be appropriate when durability and enclosed raw edges are important.
Stretch fabrics require a different approach altogether. An Overlocker or a sewing-machine stitch designed for stretch can allow the finished seam to move with the fabric. A construction that works beautifully on woven cotton may become restrictive or unstable on jersey.
Instead of asking which seam is universally “best,” ask a more useful question: Which seam gives this fabric and project the right balance of strength, flexibility, edge control, comfort, and appearance?
That mindset will serve you well as your sewing skills develop.
Understanding Seam Allowance Before You Start Sewing
Seam Allowance is the distance between the stitching line and the cut edge of the fabric. It provides the material needed to construct and finish the seam.
There isn’t a single Seam Allowance that applies to every sewing project. Commercial patterns and other sewing instructions specify their own requirements, and those measurements should be followed carefully. Different techniques may also require different allowances.
Consistency is crucial. If your Seam Allowance changes from one section to another, the finished dimensions can change as well. On garments, that can affect fit. In projects involving multiple pieces, it can also make matching seams and edges more difficult.
Enclosed constructions may require trimming or grading the seam allowances to reduce bulk. This becomes particularly important when several layers eventually meet.
Accurate cutting and consistent Seam Allowance control may not be the most exciting parts of sewing, but they provide the foundation for clean construction.
How To Sew A Clean And Accurate Seam
A neat seam begins before the sewing machine is switched on. Fabric should be cut accurately, the correct sides identified, and the pieces aligned according to the pattern or project instructions.
Pins or clips can help hold layers in place, particularly when matching seams or dealing with material that shifts easily. Once you’re ready to sew, use the machine’s seam guide or another consistent reference point rather than trying to judge the distance by eye.
Keep your sewing speed steady and avoid pulling or stretching the fabric unnecessarily. In most situations, the machine should feed the fabric naturally. For certain difficult materials, however, additional control or specialized equipment may be useful.
After stitching, secure the seam as required by the project and press it. If the technique calls for trimming, grading, clipping, or another treatment, complete that step at the appropriate stage.
A good seam isn’t merely a row of stitches. It should be accurate, smooth, suitable for the fabric, and properly prepared for whatever construction comes next.
Why Pressing Is Just As Important As Stitching
Pressing is one of the easiest sewing skills to underestimate. Yet it can make an enormous difference to the finished result.
Pressing helps seams lie flat, establishes shape, and makes subsequent construction steps easier. It isn’t quite the same as ironing a finished shirt. In sewing, the iron is often placed deliberately over a section of fabric to set the stitches and shape rather than constantly moved back and forth.
The correct technique depends on the fabric. Heat-sensitive or delicate materials may require lower temperatures and careful handling. Some fabrics respond well to steam, while others require a drier approach.
Seams can be pressed open or toward one side depending on the pattern and construction. Enclosed seams also need careful pressing so that the folds remain crisp without introducing unnecessary bulk.
Taking a few extra moments to press each stage can make an otherwise ordinary project look considerably more polished.
Common Nahttypen Mistakes And How To Fix Them
Mistakes are part of sewing, even for experienced sewists. Puckering, uneven Seam Allowances, shifting fabric, exposed raw edges, and bulky seams can all appear when you’re learning a new material or technique.
Puckering may have several causes. Machine tension, needle selection, thread, stitch settings, or fabric handling can all contribute. Changing several settings at once, however, can make it difficult to determine what actually solved the problem.
Fabric movement is another common issue. Slippery materials, multiple layers, and fabrics that feed differently beneath the presser foot can cause one layer to move ahead of another.
When something looks wrong, don’t automatically assume you’ve made a serious mistake. Stop, inspect the setup, and make a small test piece. Check the needle, thread, stitch length, tension, Seam Allowance, and feeding of the fabric.
A test sample often provides the answer much faster than repeatedly unpicking a finished garment.
Choosing The Right Needle, Thread, And Stitch Settings
The choice of Nahttypen is important, but it isn’t the only factor that determines seam quality. Needle type, needle size, thread, stitch length, and machine settings all need to work with the fabric.
A lightweight woven fabric may require a very different needle setup from denim, canvas, or stretch jersey. An unsuitable needle can contribute to skipped stitches, fabric damage, or poor stitch formation.
Thread also needs to be appropriate for both the fabric and the machine. Stitch length can influence the appearance and performance of a seam, while machine tension affects how the upper and lower threads interact.
There isn’t a single machine setting that works perfectly for every material. That’s why testing is so important. Use a scrap of the actual fabric and test the same needle, thread, stitch, and settings you plan to use for the finished project.
That small step can save a great deal of frustration later.
Using A Walking Foot And Other Helpful Sewing Tools
A Walking Foot can be helpful when several layers of fabric need to move together. It can be particularly useful with bulky, slippery, quilted, or layered materials because it helps feed the upper layers more evenly with the lower layers.
You won’t need a Walking Foot for every project. However, when ordinary feeding causes layers to shift, it can give you much greater control.
Other simple sewing tools have their own practical advantages. A Seam Gauge makes it easier to check measurements. Fabric clips can hold thick layers without creating the pressure associated with pins. A Seam Ripper is invaluable when a section needs to be removed and sewn again.
The right tools don’t replace sewing skills. They simply make accurate work easier to repeat.
Seam Types For Different Sewing Projects
The best Seam Type often depends on what the finished item needs to withstand.
A lightweight blouse may benefit from a French Seam when a clean interior is important. Jeans may use Flat-Felled construction in areas where durability matters. A knit T-shirt may rely on an Overlocked construction or another stretch-friendly technique that allows the fabric to move naturally.
Other projects, including dresses, shirts, aprons, children’s clothing, jackets, tote bags, and home décor, can require different combinations of seams and finishes.
In fact, a single garment may use several Nahttypen. Different sections can experience different levels of stress, movement, and visibility, so there is no reason to force the entire project into one construction method.
The more sewing experience you gain, the more you’ll notice that good construction is about matching the technique to the job.
How Seam Choice Affects The Look And Lifespan Of Handmade Items
Seams are structural details, but they also have a direct effect on appearance.
A poorly controlled raw edge can fray with use. An unsuitable seam can create unnecessary thickness or restrict movement. A badly pressed seam can distort the shape of an otherwise carefully constructed garment.
A suitable seam, by contrast, can help an item withstand normal use while keeping the inside clean and controlled. That’s especially important in unlined clothing, where seam construction remains visible.
This is one reason experienced sewists pay attention to details that might never be noticed at first glance. The parts hidden inside a garment still determine how well the visible design performs.
A beautiful fabric and an attractive pattern are only part of a successful project. The construction underneath provides the support that allows the design to work.
Beginner Tips For Practicing Different Nahttypen
The most effective way to learn Nahttypen is to practice before working on an important garment. Fabric scraps are ideal for this because they let you experiment without worrying about ruining the finished project.
Try different seam constructions on the same material and compare the results. Look at both sides of each sample. Notice whether the seam lies flat, whether the raw edges are controlled, whether it feels bulky, and whether the fabric still moves naturally.
It’s also useful to label your samples. Over time, you can build a small reference collection showing how different fabrics respond to different seams and finishes. That collection can become a practical resource whenever you’re unsure which technique to use.
Most importantly, don’t treat an imperfect sample as wasted fabric. A failed attempt can tell you something useful. Perhaps the needle wasn’t appropriate, the seam created too much bulk, or the chosen construction simply wasn’t a good match for the material.
Sewing improves through observation as much as repetition.
Final Thoughts: Mastering Nahttypen One Seam At A Time
Learning Nahttypen gives you greater control over the way your sewing projects are constructed. Instead of thinking of a seam as nothing more than a line of stitches, you begin to see it as an important design and construction decision.
The right choice depends on the situation. Lightweight fabric may benefit from a clean enclosed finish. Heavy denim may call for durable Flat-Felled construction. Stretch fabric needs a seam that can move with it, while a straightforward woven project may need nothing more complicated than a carefully sewn and properly finished Plain Seam.
You don’t have to master every technique at once. Start with the fundamentals, test unfamiliar methods on scraps, and pay attention to how different materials behave. With practice, choosing Nahttypen becomes less about memorizing rules and more about developing sound sewing judgment.
And that’s where technical knowledge begins to support creativity. Once you understand how different seams work, you can make more confident decisions about your projects, experiment with new fabrics, and create pieces that aren’t just attractive on the outside but thoughtfully constructed from the inside as well.
FAQs About Nahttypen
What Does Nahttypen Mean?
Nahttypen is the German term for different Seam Types. In sewing, it refers to the various ways fabric pieces can be joined or constructed. Examples include Plain Seams, French Seams, Flat-Felled Seams, and other specialized constructions.
What Is The Easiest Seam For Beginners?
The Plain Seam is generally a practical starting point because its construction is straightforward and it’s used in a wide range of sewing projects. It also gives beginners a chance to practice accurate Seam Allowances, fabric alignment, machine control, and pressing before moving on to more specialized techniques.
When Should I Use A French Seam?
A French Seam is particularly useful for lightweight or sheer woven fabrics when you want the raw edges enclosed. It’s especially suitable for straight and gently curved seams. Heavier fabrics can become bulky with this construction, while sharply curved seams can be more difficult to handle neatly.
What Seam Is Best For Denim?
A Flat-Felled Seam is commonly used for denim and other durable woven garments because it encloses the raw edges and provides a strong, neat construction. However, denim varies considerably in weight, so the appropriate technique should also take fabric thickness, seam location, machine capability, and the garment design into account.
What Is The Difference Between A Seam And A Seam Finish?
A Seam joins fabric pieces together, while a Seam Finish treats the raw edges created by that construction. A finish can help control fraying and improve the appearance of the inside. Some techniques, including French and Flat-Felled Seams, combine joining and edge enclosure in one construction.
Why Do My Seams Pucker?
Puckering can have several causes, including unsuitable needle or thread choices, machine tension, stitch settings, or the way the fabric is being fed through the machine. The most useful first step is usually to test the same fabric, needle, thread, and settings on a scrap rather than immediately changing several things at once.
Should Every Seam Be Pressed?
Pressing is an important part of most sewing projects because it helps establish shape and keeps seams flat and controlled. The precise method depends on the fabric and construction. Always use a temperature suitable for the material, and take extra care with delicate or heat-sensitive fabrics.
How Can I Practice Different Seam Types?
Start with scraps of the fabric you plan to use. Practice a Plain Seam, French Seam, Flat-Felled Seam, and several Seam Finishes. Compare the samples from both sides and pay attention to thickness, appearance, flexibility, and edge control. With repeated practice, you’ll develop a much better sense of which Nahttypen suit different fabrics and projects.
Learn more and explore exciting content on: Fabiana Pimentel: Everything to Know About Mel Owens’ Ex-Wife